Friday, December 17, 2010

Shakin' and Tiltin'


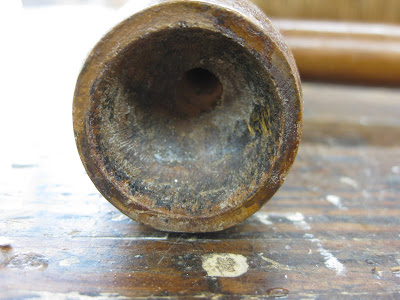
I recently had the opportunity to replace a missing tilter on the rear leg of a Shaker side chair. According to Tim Rieman in "The Encyclopedia of Shaker Furniture," the tilter is "a device designed by Shaker chair makers to allow the chair to tilt backward slightly without causing damage to the wood floors. It consisted of a half-sphere inserted into the hollowed rear post of a side chair, secured with a leather thong passing through holes drilled into either side of the post and through the rounded portion of the ball. A metal version was patented by Brother George O. Donnell of Mount Lebanon in 1852."


Thursday, November 11, 2010

Waste Not


One thing that you notice when working on period pieces of furniture is the conservation of materials. That's why there is primary wood (skin) and secondary wood (bones). The opening photograph is an excellent example of the conservation of material. This large molding at the waist of a tall clock case is primarily of cherry laminated to poplar to build-up the required shape. Typically you see this done with mahogany as it has always been expensive, and less so with more abundant cherry.

I love this next photo. Most wood working apprentices, at some point in their training, are sent off to find the board stretcher. It's a great joke on them, akin to a snipe hunt for first year campers at scout camp. And at times I wish I had a board stretcher after crosscutting a board too short. But here, you can see, the craftsman actually stretched the board by dovetailing in an extension piece. Brilliant. No one was ever going to know except some future repairman....who in this case was very impressed.

Friday, October 29, 2010

Pommel Knife


A pommel knife (bottom) is a chairmakers tool. It is basically a drawknife with one of the handles in line with the blade. This configuration allows the chairmaker to shape the chair seat in the area of the pommel (the raised area at the front of many windsor chair seats). This tool was developed beacause the bent handle of the drawknife would not allow the tool to negotiate the curve of the pommel.

Tuesday, October 12, 2010

Bevy of Bunn


Here you see a series of Bunn feet for a ship model case. The client wanted ivory feet. The best that I could come up with is holly. They turned out pretty well.

Tuesday, October 5, 2010

"You're Building a Boat?"


Yes, that seems to be the response from people when I reveal my latest project endeavor. The follow-up question then being "have you ever built a boat?" My answers are yes and no, respectively. I have been wanting to build a boat on-and-off for about sixteen years. I have lived almost my entire 51 years within a half mile of the ocean, so I see this as a perfectly natural and appropriate project after having my body and soul infused with salt air for so long.

The boat that I plan to build is a Herreshoff 12-1/2. I fell in love with this boat after bumping into her at the Woods Hole Historical Museum about 15 years ago. She was originally designed by Captain "Nat" Herreshoff and built by the Herreshoff Manufacturing Company in Bristol, Rhode Island, in 1914. She was designed for sailing in Buzzards Bay and become the most popular boat they built, ending production in 1943. The company went out of business shortly thereafter.

The overall length is 15-1/2 feet, 12-1/2 feet along water, with a 5 foot 10 inch beam and 1-1/2 foot draught. The plans arrived yesterday, so I've just started immersing myself in them. The first order of business is to find a place to "loft" or draw the plans full size. Once that is done, I can start thinking about a boatbuilding shed...This is going to be great fun. Stay tuned.

Thursday, September 30, 2010

Humidity


To my horror, as I began to apply shellac to this reproduction globe stand this morning, the shellac turned white. There is so much moisture in this tropical air we are getting today on Cape Cod, it infused the shellac with water vapor. Same thing that happens when you place a wet glass on a shellac finish table top.

No need to fret, my trusty shop hair dryer drove the moisture away and returned the shellac to its clear self.

Wednesday, September 29, 2010

Windsor Reproduction Follow-up

Here's a picture of the Winterthur Philadelphia Fan-back Arm Chair complete with finish. See previous Blog entry for the story. Turns out that this is the most comfortable chair that I've made.

Tuesday, September 14, 2010

Making Windsor Chair Reproductions


Note: This Blog post was first written as a guest Blog for the Windsor Institute, Mike Dunbar's school of chairmaking in Hampton, NH.

I have been spending a lot of time over the past year studying and making, what is known at The Windsor Institute (TWI) as, the Nantucket Fan Back chair (NFB). But I have not been making copies of The Institute's chair, I have been measuring and reproducing originals from museum collections.

The Winterthur Museum and Country Estate in Wilmington, Delaware commissioned me to reproduce a Nantucket-made High Fan-Back Arm Chair in their collection branded “C. Chase.” The museum wanted the reproduction chair for the exhibition titled “Harbor and Home, Furniture of Southeastern Massachusetts, 1710 – 1850”. The exhibition opened at Winterthur in March and moved to the Nantucket Whaling Museum in July, where it will remain until November 3, 2009.

A nearly identical chair with Chase’s brand is in the collection at Colonial Williamsburg. Other type Windsor’s are also known with his brand. Charles Chase was a house joiner and chairmaker in Nantucket, active between 1780 and 1820.

The NFB chair, also known as a High Fan-Back Arm Chair, is the period chairmaker’s tour de force. You will find one gracing the cover of Nancy Goyne Evans’ tome “American Windsor Chairs.” They are highly sought after by collectors and bring consistently high prices at auction, owing to their beauty, comfort and scarcity. Design elements include a large seat, turned stiles and arm supports, bracing spindles with joined tailpiece, carved knuckles, and volute-carved ears on a steam-bent crest.

The design for the NFB came originally from Philadelphia, where chairmaker’s for decades had been making a High-Back Arm Chair, based on earlier English designs, known at TWI as a Philadelphia High Back. Owing to the extensive sea trade between the Quaker port communities of Philadelphia, New Bedford, and Nantucket, it is no surprise that these chairs were exported to New England. Philadelphia chairs have been found on Nantucket with long histories of island ownership.

In the Fan Back Arm Chair, the arm bow of the earlier chair was eliminated and structurally replaced by two stiles to which the sawn arms are attached at mid-length and the crest at the top. This change eliminated the need for a long steam-bent arm bow and resulted in a more comfortable chair, provided with an array of flexible spindles cradling the sitter’s back. The addition of two bracing spindles allowed the chairmaker to increase the slope of the back, further increasing comfort. These were clearly designed as easy chairs for relaxing or reading versus the more upright and/or armless chairs used for working, dining and/or garden seating.

One of the most interesting design developments in the NFB over the Philadelphia chair is in the seat. The seats on the Philadelphia chairs were smaller and more round in shape with an integral coffin-shaped tailpiece to support the bracing spindles. Typically the grain is diagonal on these poplar seats. By laying the seats out in this fashion, the chair would benefit from the strength of front to-back grain in the tailpiece with less waste using a narrower board.

Nantucket-made chairs feature a larger oval-shaped pine seat with the grain running side-to-side. A tailpiece with grain perpendicular to the seat is joined with a substantial pinned mortise and tenon joint. This method of joinery was a significant development in the Nantucket chair as it allowed for a larger seat utilizing 16-inch instead of 22-inch wide boards. Even in the eighteenth century, clear, 2-inch thick, wide pine was scarce and costly, particularly on an island 28 miles out in the Atlantic Ocean. Indigenous original growth forest timbers had been long felled by this time. It is likely that Charles Chase’s training as a house joiner was the source of this timber-framing joint in his chair. Other island makers soon followed his lead.

Last winter, I was commissioned by the Nantucket Historical Association to reproduce a pair of chairs from one in their collection, made originally on Nantucket by Frederick Slade in about 1799. This chair differs from others of this type in that it has more cylindrical-shaped stiles, separated by a series of rings above and below the arms, a larger crest, and very unique carved knuckles on the arms. It is also more upright than most other examples of this type.

Just recently I was asked by Winterthur to reproduce one of the Philadelphia High-Back Arm Chairs in the their collection that is most closely related to the Nantucket examples. I look forward to measuring and photographing this chair to compare it to the Nantucket example with which I am familiar.


I feel extremely fortunate to have the opportunity to measure and reproduce magnificent examples of a single form of chair and to understand the regional characteristics and differences among makers within a region.

Saturday, September 11, 2010

Constructing a Tray Table Part 2


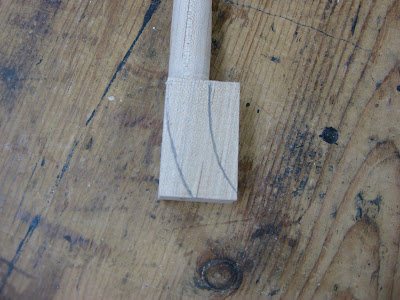
Because the ankles of the legs on these tables turn out, one is presented with an interesting challenge. To accomplish this form, the leg is turned on the lathe as you would any other leg, except the portion that will turn out is left unturned. The resulting block is then bandsawn to the thickness of the bottom of the leg.


A pattern is prepared of the desired shape which is then marked on the block. This shape is sawn out with a turning saw or band saw. The final shaping is done with rasps, files, and sandpaper.

Friday, August 27, 2010

Chair Wars


This chair and I do not get along. I want it to be a chair. It wants to be a pile of sticks. I have a customer who also wants it to be a chair. The problem is the seat, obviously.

Its an English Windsor chair with an elm seat and yew turnings. The yew, as is typical, is brittle and bug eaten. So when my client, who is of Yeti genes, sits in this chair likes its an Eames easy chair, it protests by snapping its spindles.

The disfigured seat contorts the spindles, so they are not easily repaired. This time I let the spindles be where they wanted to be and drilled new holes for the pair on the right side. It seems much sturdier and happier. Take that Yeti!


Monday, August 23, 2010

Turning Ten


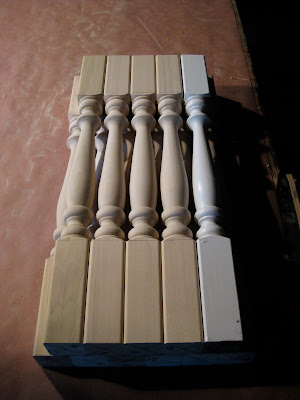
I was recently asked to make ten balusters to match the white one seen at right in the photo. Given that I rarely say no to work, particularly in this economic climate, I agreed. Some shops possess a duplicating lathe, where you first make a template of the turning that you want, then run a guide pin along the template, while a cutting bit cuts out the shape on the blank. Easy. You can crank out identical turnings all day long.

To me that's too much like factory work and void of the skill required to to produce multiple similar turnings. Notice that I didn't say identical. They are not, nor do they need to be. Take a look at any antique Windsor chair. As you view the overall chair you see four legs all the same. A closer inspection will reveal variations in the legs. Sometimes subtle, other times significant. Yet, it doesn't distract from the overall composition.

Anyway, turning is a lot of fun, so why let a machine do it. And for you smart alec's that noticed the center turning is a little fat, you're right. So did I fix it or leave it? What would you do?

Saturday, August 21, 2010

Too Many Clamps?


Cliche you think. If you have done any woodworking or even know a woodworker you have no doubt heard the line "you can never have too many clamps." There is a good reason for this. The photo above shows two 8-foot long glue-ups for turning blanks. Thirty-two clamps in use. If I didn't have the clamps I would have to glue over two days, losing valuable time. Since I make a living at this, that's an important consideration. So, stock up!

Friday, August 20, 2010

Pencil Carving Virtuoso


A friend sent me a series of photos of the work of an accomplished carver working in a rather unconventional medium. I don't know to whom I should give credit, but if this is your work and you happen to be reading this blog (unlikely ), let me know and I'll be sure to give you the credit you deserve. I'll also thank you for putting a smile on my face today. See the remainder of the photos here.

N.B. Well I've been informed these sculptures are the work of Dalton Ghetti of Connecticut. Thanks Mike.

Monday, August 16, 2010

Constructing a Tray Table Part 1


Shown above is a Regency style tray table that I recently made for a client. He provided the tray and I designed and built the table. I have done quite a number of these over the years. It seems to be a very popular way to display and use a decorated tray.

The antique trays that I see are typically mid- to late nineteenth century, made of papier mache, and wonderfully decorated with paint, gold leaf and mother of pearl. In the twentieth century they began to make the trays of metal. These decorated metal items are known as toleware.


The tables are most often black, but sometimes red, picked out with gold. The legs are lathe-turned and have a nice little turn-out at the bottom, reminiscent of a french foot found on many Hepplewhite case pieces.

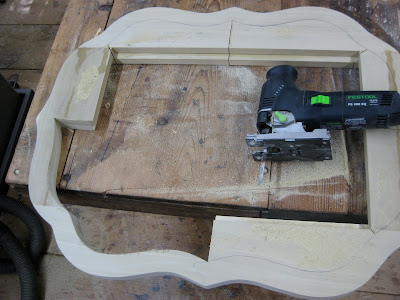
I start by making a template of the tray by tracing the actual tray. Then using a flat washer of the right size, I run the washer around the tray with a pencil in the hole giving me a 1/4" offset from the tray perimeter. This results in a slightly larger frame than the tray, which protects the fragile edges.


I stack laminate two rectangles of 3/4" poplar and when the glue drys lay on the template. Cut the outer shape using a band saw or jig saw and clean up to the line with spokeshave, rasps and sandpaper.


I figure out the required width of the frame, based on the width of the flat perimeter of the tray, and scribe that dimension on the frame.


All that's left is to cut the inside shape; this must be done with the jig saw. This can be left unfinished, right from the saw. In Part 2 I'll discuss making the legs.

Saturday, August 14, 2010

Be on the Lookout

This advertisement appeared in the Barnstable (Cape Cod, Mass.) Patriot on December 19, 1929. Apparently I am not the only one who values their Windsor chairs.

Tuesday, August 10, 2010

Saws Happen


I don't collect saws. Really. I readily admit the dozens of saws that you see in the pictures are mine, but I swear I did not collect them. They just happened. You could say that I have "accumulated" them over the past thirty years. They conglomerate like dust bunnies; everywhere you look in my shop you find saws. They hang on the walls and from the rafters, they stand up in corners, and they lie on the floor in the attic.

There are panel saws, back saws, dovetail saws, gents saws, tenon saws, carcase saws, stair saws, ripsaws, crosscut saws, miter box saws, bow saws, turning saws, fret saws, and coping saws. Oh my!

The reason I have so many is that I just can't pass up a bargain. Hand saws are truly ubiquitous. Before the advent of power saws every tradesman owned at least two and every home probably had one. Fast forward to today and you find them showing up at nearly every yards sale, auction, and second hand store.


As unlikely as it may seem, I usually don't buy, but I always look. And when I find an old saw that has been well cared for and has a shapely, carved apple-wood handle and a long line of straight and well-formed teeth, a brass medallion and a strong etching on the blade of a proud manufacturer, with a price of 3 or 4 dollars, then I do buy.

Being a user and lover of old tools, I simply cannot pass up these bargains. While I may never use all of my adopted saws (I do have my favorites), at least they will be at home in a working shop and among friends.


Sunday, August 8, 2010

Four Bells


Four bells. That's quittin' time around here. I hope you ran the brief video to hear this wonderful clock. It's my shop companion these days, mostly because the noise from the fluorescent lights drives my dog nuts. And to think, that's the reason I got her.

Back to the clock. It is a Seth Thomas 30-hour Ship's Bell clock made in 1919. These early versions of the ship's bell clock featured an external bell. Later the bell was housed inside the case. I do prefer this version as it is cool to look at and I think has a better sounding bell than the later version. Because its a 30-hour clock, part of my daily routine is to wind it. But I don't mind. I like the idea that it needs my help to do its job.

So, you may be asking what's with the four bells. For centuries the passage of time on a ship was signaled by ringing a bell every half hour. An hourglass kept the time. The ship's watches are divided up into 4-hour shifts; six per day. Therefore, at the completion of the first half hour of your watch, the bell would ring once, the first hour, it would ring twice, and so on until the end of the watch which was signaled with eight bells. Because I knock off at 6:00, the bell tolls four times.

Friday, August 6, 2010

Can Opener


A lowly can opener. Hardly. This is one of my all-time favorite tools. I say that because it is simple and does its job perfectly. I use it to open paint and finish cans. But wait, there's more. You probably noticed some writing on the business end of this beauty as I did. What you find there is the manufacturers name and a Patent date. The Patent date is Nov. 7, 1933.

I am sure that there is no need to tell you this, but there is actually a Google Patents site. This site is Shangri-La for tool geeks. The place where you can really get far more than you would ever need to know about any patented tool. Ahhh, nirvana. Punching in the Patent date delivers me the details of U.S. Patent No. 1934594, Container Opener by Henry J. Edlund, Burlington, Vermont. This dude was obviously way ahead of his time. Check out the drawing below and see all it can do.


Not too long ago I lost my can opening sidekick and was rather distraught about the whole thing. I was doing a job at the local library and after I got home that evening I found that it had gone missing. I enlisted my friend Lucy, the library director to help me track it down. It was no use. It was gone. I still suspect the library maintenance man, as i did notice him lusting over it while I worked that day.

However, all hope was not lost. After searching eBay for months, one turned up. And if I have to open cans on a job site in the future, I'm using a screwdriver.

Thursday, August 5, 2010

Oh Scrap!

Scrap, waste, and off-cuts, (not Cut-Offs, those are old jeans turned into shorts) are all terms for the wood left over from a project. Some woodworkers believe that there is no such thing, that its all usable down to the dust. That may be but they must have a lot more space and organizational skills than I do. I generate serious volumes of this stuff. What you'll find in my scrap bin includes cherry, walnut, pine, mahogany, oak, and maple. A medley of the great cabinet woods.

So, what do I do with it? I burn it. Its great kindling for the nightly fires we have in the house fireplace between September and May. In the off-season I save it up for the fire season and I usually have just about enough to get us through.

Dinner guests are often heard to exclaim " you can't burn that, its beautiful." My standard response is "unless you take it home with you, its going to be burned." We have one friend who takes me up on the offer and carries it home. I suspect that after they realize there is not much that they can do with it they burn it in their fireplace.

By the way, I did not win the auction for the windsor chair. It sold for $350.00. It wasn't such a sleeper after all.